Tuesday, July 30, 2013

Clean Hawaiian Chicken


So, this is really a combination of recipes I've seen lately--but I wanted to make mine clean, and still tasty.   It might seem like a daunting work load with the homemade fire roasted tomato sauce, but once you make your own tomato sauce youll stop buying nonsense from a can or jar--which is my goal for all of you.  I have to give the shout out to the following blogs:  In July Christina posted this: http://www.thecommunityplate.com/2013/07/aloha-chicken-rice.html.  This is my omage to her and Megan Jane's Aloha Chicken.  Seriously, follow her blog--her recipes are amazing!! Plus, her pictures are so much better than mine.  In my journey to make this clean I also borrowed from Kate: http://happyhealthykc2.blogspot.com/2013/04/barbecue-pulled-chicken.html  Follow her as well. Great clean recipes as well as an inspiration, mentally and physically--and my BFF.

            Essentially, I've taken the best of both worlds and combined them here for you today.  Look at their versions, then look at mine.  We've done things differently, but all the same taste in the end.  That's my goal here--for you to understand CLEAN can be good.  Also..ANYONE CAN MAKE THIS.  I DON'T CARE IF YOU'VE NEVER COOKED IN YOUR LIFE,  There is no skill involved in most of my recipes( when do you think I'll be able to spell the word recipe?  Autocorrect changes it for me every time, don't be impressed) . 

Clean Hawaiian Chicken
Prep (including fire roasted sauce): 65 minutes
Cook Time: 6-7 hours
Serves: 8
Let's start with the recipe for the Clean Fire Roasted Tomato Sauce: 

Ingredients for Fire Roasted Tomato Sauce:
  1. 4 Red Ripe Tomatoes (Jersey if possible)
  2. Vegetable oil for coating tomatoes
  3. 1 tbsp Tomato Paste
  4. Salt, Pepper
  5. 2 Handfuls of fresh Oregano (you can use jarred if necessary, all the same--kind of)
  6. 2 Tbsp Parsley Flakes
  7. 2 Cloves garlic, peeled
Directions:  Usually while the tomatoes are cooking I go about my buisness in the house,  cleaning and cooking other things.  That hour spent cooking the tomatoes is really an hour you can use to do whatever.
  1. Preheat the oven to 400 degrees.
  2. Line a baking sheet with tinfoil, or use a baking dish with a lip.
  3. Take the four tomatoes and cut a deep crosswise mark in the top.  THIS IS VERY IMPORTANT!!  If you don't cut the top with the mark, the tomatoes might explode in your oven.  No cut= tomato go boom
  4. Place the four crosswise cut tomatoes in the baking dish and rub with vegetable oil, salt, and pepper.  Why vegetable oil?  Remember we talked about smoke points of oils?  If you put EVOO in the oven at 400 degrees your fire alarm will be going off within a half hour.
  5. Place the tomatoes into the oven for about 45-60 minutes, checking about every 30 for the char you'd like.
  6. Remove tomatoes from oven and place directly into the blender with a pinch of salt, pepper, parsley flakes, fresh oregano, and tbsp tomato paste. 
  7. Puree for 1-2 minutes, until creamy.


    This is my do ahead part of the recipe.  I do this the night before, let it cool, and place it in the container to refrigerate overnight.  This also freezes really well so you can keep it on hand for other recipes you may see with fire roasted tomato sauce.
 Now..on to the pea resistance... The clean Hawaiian Chicken you are all anxiously awaiting.
       

Clean Hawaiian Chicken 

For the chicken bbq recipe we are for the most part going to follow Kate's above--with some minor changes.  You will need the following:


 Ingredients:
  • 3 tablespoons cider vinegar
  • 2 tablespoons honey
  • 2 tablespoon paprika
  • 1 tablespoon tomato paste
  • 2 tablespoon Worcestershire sauce
  • 2 teaspoons dry mustard
  • 2 tbsp chile powder
  • 1/2 teaspoon salt
  • 1 small onion, finely chopped
  • 1 clove garlic, minced
  • 5 large chicken breasts, trimmed of excessive fat (leave some, your not making beef jerky here)
  • Homemade Fire Roasted Tomato Sauce 
  • 2 Cans Pineapple Chunks--VERY IMPORTANT--- make sure the pineapple chunks are canned in water, not syrup.  You should be able to read and understand the ingredients in clean cooking.

  • Directions:
     
1. Mix the first 8 ingredients in a bowl with a whisk. 

2. Chop onion and garlic, throw into your bbq sauce mixture.
3. Place 5 large chicken breast on the bottom of your slow cooker and season with salt and pepper.  Cut semi-deep cuts in the chicken to help the sauce to penetrate inside while cooking, which will also make the chicken less likely to dry out.  Remember, we aren't making beef jerky here.
4. Whisk bbq sauce into fire roasted tomato sauce.


5.  Pour one can of pineapple chunks directly on top of the chicken with pineapple water.  For the second can, drain the water and pour JUST the chunks in the chicken.


6. Pour your bbq sauce and fire roasted tomato sauce over top of the pineapple and chicken mixture.
7.  Cover the Slow cooker with the lid,  set to low, allow to cook for 6 hours.
8. After 6 hours remove chickens with tongs and shred.  I don't like my chicken very finely shredded, so mine are bigger chunks. 
9.   After the chicken is shredded stir back into the remaining sauce in the slow cooker to allow the chicken chunks to absorb some of the juice in the cooker--about 30 minutes.
10.  Serve over brown rice.

This recipe, as the Community Plate blogged previously--will rock your world.  This is my twist on the Aloha Chicken-- Clean Hawaiian Chicken (served over brown rice) It also freezes really well, which we all know I love.

Wednesday, July 24, 2013

Cold Clean Couscous Salad

Couscous is amazing.  Have you ever had it?  If not, try it now--in this recipe.  You will not be disappointed. 

Cold Clean Couscous Salad
Prep Time: 20 minutes
Cook Time:5 minutes (Couscous)
Serves: 8-10(depending on how served)

Ingredients:
  1. Pine Nut Couscous
  2. 1 Can Black Beans
  3. 1 Can Sweet White Corn
  4. 1 8 oz Can Diced Tomato with Green Chilies
  5. 1 Can Chick Peas
  6. 1 Handful Fresh Cilantro
  7. 1/3 Cup good Extra Virgin Olive Oil
  8. 14/ Cup Lime Juice
  9. 1/2 red onion
  10. 1 Avacado
  11. 1 Red Bell Pepper 
  12. 1 Large Clove Garlic
 Directions:

  1. Drain all canned beans into a strainer and rinse well.
  2. Pour diced tomatoes on top and rinse well (you do not need the juice it is canned in)
     
  3. Allow what is in the strainer to sit and dry well (remember oil does not stick to water!!)
  4. Cook Couscous according to package directions and let cool.
  5. Place your beans and tomatoes in a deep bowl and set aside.
  6. Dice 1/2 one red onion and one red onion. Place in bowl with beans and tomato.
  7. To make the dressing: chop one garlic clove and one handful of cilantro and place into a separate bowl. 
  8. Add olive oil and lime juice, whisk well.
  9. Add the cooled couscous to your salad and pour over the dressing.   Stir well/
  10. Lastly, dice the avocado and place into the salad as well.  Mix gently as to not break up the avocado.


    Serve on it's on as a side or over a salad.  Delicious and beautifully colored.  Will sure to please your guests. 


Sunday, July 21, 2013

The Emotional Healing Benefits of Crossfit


Did you ever just have one of those days where in your head your thinking you could take out a small village with the rage pent up inside you? Don't lie, you have.  Sometimes something gets so overwhelming that you think you might break, don't worry you won't--it would take a lot of force to break down the entire human body.  Today, I wanted to talk about the emotional healing benefits of not only crossfit but exercise in general.

I've been through a lot this year.  Emotionally and physically. You may be happy to know my doctor thinks I can live the rest of my life with the heart I have.  It hasn't gotten me too far anyway, being I am single and all.  Do you think they will still let me trade it in for a new one?  Doubtful.  I'll look into it though.  So, with my old heart and my new outlook on life I realized this:  Wod's make me happy, people can be stupid (sorry), and some people will never change.  One thing you can change however is your mood--by working out.

Did you know..."Researchers from the Penn State University found in their study that the more physically active people reported greater general feelings of excitement and enthusiasm, compared with the less physically active people."  (Source: http://www.huffingtonpost.com/2012/02/09/exercise-happy-enthusiasm-excitement_n_1263345.html).   Wow, who knew.  One wod a day will keep the moodiness away.

When you exercise As your heart begins to pound, levels of the feel-good neurochemicals serotonin, dopamine and nor-epinephrine rise in your body. So does brain-derived neurotrophic factor (BDNF), a substance that may protect your brain from emotional disorders and repair damage that stress and depression cause. At the same time, opiate-like endorphins and endocannabinoids (similar to the other kind of cannabis) flood your system, leading to a sense of well-being. (Source: http://www.self.com/fitness/2012/05/benefits-of-exercise).  What do all those words and chemicals mean?  Here's the simple breakdown:  When you exercise your brain releases feel good chemicals and you stop thinking about what is making you sad, defeated, down, etc.

The effects can be long lasting...Research has found that a mere 20-minute workout can produce more subtle mood benefits that last as long as 12 hours. (Source: http://www.self.com/fitness/2012/05/benefits-of-exercise).   So, instead of what we used to believe to be called "Runner's High"  a good workout can actually change your entire day---if you're awake for 12 hours at a time. I hope so, but if not, I ain't judging you--this is a no judgie zone.

What about PR's and goals?  Us crossfitters know how important they are.  You hit a PR and all of sudden your dancing around like a fool staring in your own little show called "I PR'ed".  No one else cares--but it's almost like your accepting your first Grammy.
 These are my goals on the goal board from Solstice.  One day I was throwing around the 95 lb bar trying to do a clean and jerk and I was cursing and throwing things (my MO).  My coach Joe said to make it my goal..so I did.  2 weeks later I have accomplished not only 95 lbs but 105 lbs as well.  When I picked up 95 and did it immediate I was dancing around like a dumb ass.  Did I care that there were people around? Nope. I wish they had a video of it somewhere--it's American's Funniest Wod's worthy.  Okay lose 20 lbs,  I am trying.  18 more to go.  I know I can do it because my support system at Solstice is phenomenal.  Also, I try to eat clean as much as possible--- this week keep an eye out for my Clean Hawaiian Chicken. Even though it's not my goal either my Push Jerk is around 135.   I'd like to get it up to 150 by the end of this month.

GUESS WHAT...
Exercise has many psychological and emotional benefits too. It can help you:
  • Gain confidence. Meeting exercise goals or challenges, even small ones, can boost your self-confidence. Getting in shape can also make you feel better about your appearance.
  • Take your mind off worries. Exercise is a distraction that can get you away from the cycle of negative thoughts that feed anxiety and depression.
  • Get more social interaction. Exercise may give you the chance to meet or socialize with others. Just exchanging a friendly smile or greeting as you walk around your neighborhood can help your mood.
  • Cope in a healthy way. Doing something positive to manage anxiety or depression is a healthy coping strategy. Trying to feel better by drinking alcohol, dwelling on how badly you feel, or hoping anxiety or depression will go away on its own can lead to worsening symptoms.
    (Source: http://www.mayoclinic.com/health/depression-and-exercise/MH00043)
So, what is the point of my rant?  Put on your big girl/boy pants and go do a WOD so you don't go all postal on anyone.  Stay healthy, stay happy, and stay positive.  Life is only so long and unhappiness, grudges, and regrets are like a disease that will pull you down to their level.

 The wise Julie Foucher once said: If you put in the work, you will see measurable improvements. AMAZING.  (Source: http://juliefoucher.com/2013/07/14/how-crossfit-prepared-me-for-the-usmle-step-1/)


In closing---  Let go, let love, and let the WOD kick your ass.


Thursday, July 18, 2013

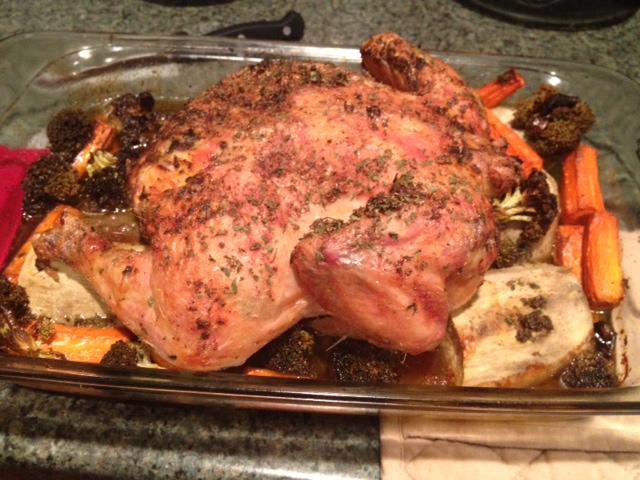
Clean Roasted Chicken with White Sweet Potatoes and Herb Rub

Clean Roasted Chicken with White Sweet Potatoes and Herb Rub
Prep: 40 minutes
Cook: 2 1/2 hours, or 20 minutes per pound
Serves: 4
Ahh, roasted chicken--so simple, so beautiful, so fragrant--SO CLEAN....

I have made probably 50 roasted chickens in my day, before I found out how to get the skin super crispy.  Today, I share my secret with you guys.

Ingredients:
  1. 4-5 pound chicken, thawed
  2. 2 cups broccoli
  3. 2 large white sweet potatoes, peeled and diced
  4. 5 large carrots, peeled and quartered
  5. 2 tbsp Fresh Oregano
  6. 1 tbsp Garlic Powder
  7. 1 tsp Garlic Salt
  8. 1 tsp Salt and Pepper
  9. 1 tbsp Parsley
  10. 3 tbsp olive oil, divided


Directions:
1. Wash the chicken well, remove inside bag. 
2. Pat dry with paper towels--like really dry.  Make sure that chicken skin is bone dry.
3. Pat salt into skin and wrap in plastic wrap.


4. Place in fridge for 40 minutes.  This will allow the salt to pull some of the moisture out of the skin.  Pulling moisture out of the skin will help the skin crisp up during cooking.
5.  While your chicken is resting in the fridge, peel and assemble your vegetables around the outside of a cooking pan.  Preheat your oven to 375.
Leave a pretty decent size space in the middle to rest the chicken.  If your chicken ends up resting on some veggies, that's okay.  Don't panic.  You've come to far now to turn back.
6. To prepare your dry rub for the chicken dice the oregano and place in a bowl with remaining spices.  Here is my rule of thumb when making roasted chicken--GREEN GREEN GREEN.  Green fresh herbs look amazing on the chicken, trust me.  When making the rub please always use atleast one fresh herb.  My choice was oregano but I also enjoy fresh parsley.  When placing the dry parsley into your rub squash it around in your hand a little to release some oils and "wake it up".


7.  Remove the chicken from the refrigerator and remove the plastic wrap.
8.  Place the chicken on a cutting board and rub the rub you made into the chicken skin. 
9.  Use a spoon or knife to separate the chicken skin from the breast right near the chickens little but cavity.  This will leave a pocket where you can inject juices and spices.  Rub some spice directly in that pocket as well.
 BAMMMM
10.  Drizzle 1 1/2 tbsp of extra virgin olive oil onto the vegetables, but try not to get it on the chicken.  Pour 1/2 cup of water into the bottom of the pan to help create juice.
11.  Place the chicken in the oven on 375 for approximatly 1 1/2 hours.
12.  After this time reduce the heat in the oven to 325, remove the chicken, and use a baster to inject some of the drippings into that pocket you created near the little chicken bum.
13.  Cook for one more hour on 325...the general rule is 20 minutes per pound, so adjust this cooking time according to the size of your chicken.
14.  Remove from oven, tent with foil and allow to cool for 10 minutes to help seal in the juices into the chicken (if you try to cut meat right out of the oven it dries and will be crumbly)

AND...WHALLAAAAAA

Chicken is awesome because you can reuse the meat for the next 2 days in different ways.  Next week I may attempt to show you how to make a yummy and clean chicken broth to freeze so you can always have it.  Chicken broth from the can has shit in it you cannot pronounce--I guarantee that.

Monday, July 15, 2013

Sundee Sauce

Remember awhile ago I promised I would teach you how to make sauce, or gravy to some.  I don't personally call it gravy, nor do I know any Italians who really do.  Gravy is brown, ya dig?

Next thing,  you are probably thinking I spelled Sunday wrong.  Nope.  Ask any old school Italian the days of the week and this is what you will hear:  Sundee, Mondee, Tuesdee, Wensdee, Thursdee, Friday, and SATURDAY (pronounced correctly for some reason).

So, here is my recipe for Sundee sauce.  One thing to know ahead of time,  sauce is an art form.  No one person's sauce tastes exactly like any other person sauce.  I learned from my father and my sauce is no longer exactly like his.  Also,  my sauce could vary according to spice, meat used, etc.  It also requires TLC.  Any person who tells you their sauce is set it and forget it is a liar.  You have to stir sauce, about every two hours so it does not stick and burn. No one is going to eat your burned sauce.  Might as well go get a jar of prego..GROSS.   Also, anyone who says their sauce is a secret cant remember the crap they put in it,  because we don't tend to measure things.  Everyone does do something a little different, but overall the different shouldn't be that dramatic.  Now, my meatballs, they are my secret---that's why I'll show you pictures but I am not sharing my secret! NEVER.

Sundee Sauce
Prep Time: 10-15 Minutes
Cook Time: No Less Then 4 Hours-Max 6
Serving: 6 People
Ingredients:

  1. 2 tbsp Extra Virgin Olive Oil
  2. 1 Package Oxtail or Pork Neck Bones
  3. 1 Package Spare Ribs
  4. 1 Small Onion, diced
  5. 3 cloves of garlic, diced
  6. 1 Large Can Diced tomato (Tuttorosso Preferred)
  7.  1 Large Can Purred Tomatoes (Tuttoroso Preferred)
  8. 1 Large Can Peeled Plum Tomatoes (Tuttorosso Preferred)
  9. 1 Small Can Tomato Paste (Tuttorosso Preferred)
  10. Palm full of sugar
  11. Palm full of Loccatelli Grated Romano Cheese
  12. Tbsp Parley
  13. Tbsp Salt and Pepper

You can use either pork neck bones or Oxtail, I just happened to grab oxtail.  Some people eat it, some people just use it to flavor the meat.  You can really use any meat with a bone in it.  I like Pork and Beef in my sauce.  


Hey, how did that Shoprite Brand sneak in there?  You can really use any brand you want,  but I prefer Tuttoroso.

Directions:
1.  Put a deep sauce pan on medium low heat with 2 tbsp of olive oil.  Saute garlic and onion until translucent and tender, about 5-10 minutes. DO NOT LET THE GARLIC BURNS.  If it burns, sorry your screwed.  It will ruin your whole sauce.
       *Side note--Some people also include diced carrots and zucchini into their sauce for added sweetness, which is a good idea.  I just did not happen to have any. 
2. While the garlic and onion is sauteing open up your canned tomatoes.    
3. In a blender combine Plum tomato can and Tomato Paste.  Blend until completely incorporated.   Put mixture aside until ready.


Left- Before Blending  Right- After Blending
4.  When garlic and onions are fragrant and translucent add meat into the bottom of the pot.   Sprinkle with salt and pepper. Let the meat brown.  Why are you asking yourself?  When we sear the outside of the meat we lock all of the moisture and juice into the meat, hence making the meat tender and fall off of the bone. All the meat to brown for 2-3 minutes on each side.


*Side Note-- This would be the time, after the meat is browned to add a 1/2 cup of red wine if you desire.  I usually do,  I just didn't feel like opening the bottle.  With or without the wine your sauce will be good.

5. After the meat is completed browned on each side add in all of your tomatoes, including the tomato mixture from your blender.
6.  Add One Palm Full of Loccatelli Grated Cheese and One Palm Full of White Sugar. 
 

Okay, remember something about sauce--you can always add, you cannot take out.  It is important to start small with the sugar and add in as necessary--after a couple hours of cooking.  Why sugar?  Sugar cuts through the natural acidity of the tomatoes.  Without the sugar, your sauce will be sour and acidic.  You could use Stevia or Sweet and Low if you'd like, but I never have.
7. Stir everything together, well.
8. Allow the sauce to come to boil, and then reduce the heat to low.  Let cook for 2 hours and it will look like this:


9.  Since the sauce has meat in it, you will see some of that natural fat rise to the top.  You can just skim it off.  Let the sauce cook for another 2 hours then stir and skim.  Repeat, Repeat.
10.  After about 4-6 hours your sauce will have reduced by about half--

This is where your guests may be arriving shortly, or your husband/wife, so you can stir and cover the pot.  Covering the pot will stop the sauce from continuing to reduce.
So, that's Sundee Dinner in a nutshell.  I added ChickPea's to mine, that's old school.  I add them in around hour 3 and let them cook in the sauce for one hour.   


OH YEAH---your short ribs are going to fall off the bone, don't forget to remove the bones : )

If you cook your sauce long enough and right, the meat will just fall right off the bones. 


Sauce is a labor of love.  I am guaranteeing you that you most likely will not get it right the first time.  After that, you'll find your groove like Stella did.

Here is what Sundee Dinner looks like at my house:
Tomatoes, Buffalo Mozzarella, Roasted Red Peppers--aka Antipasta (Italians say Antipas--meaning no pasta).

Meatballs, Shortribs, and Oxtail.  I cook the meatballs in the oven and then put them in the sauce for about 1 hour before I pull them.  You cannot be too rough with the sauce once the meatballs are in, or else they will fall apart.  

My secret to my meatballs makes them so good you can eat them without sauce. That's what you want. When someone walks in the house they should be able to pick up one of your meatballs and eat it as is.  My grandmom made the best meatballs and the whole house smelled of fried meatballs.   
Also, if you go to someones house and the meatballs are all perfectly round you can bet they are frozen from a bag.  Meatballs should not all be the perfect shape.


Red wine!! VINO!!!

Red wine goes with sauces and meats
White wine goes with light fare, like fish.


 Nice thick cut crusty bread.  Yes, this is a cheat meal.  I made my pasta last night with Wheat Pasta,  Which of course I forgot to photograph.


AND FINALLY---FRIENDS AND FAMILY!!!

My sister is far left, next to her is Alli who is a crossfitter and my BFF, and Joe who is a crossfit trainer and friends who is allergic to smiling.

Oh yeah, and after dinner drinks.  My brother in law Jeff loves Jameson on the rocks!


and..ICE CREAM!!!! Mr. Dippys!!